티스토리 뷰
Entity는 무엇이고 왜 사용할까?
Ngrx Entity는 데이터들을 이상적인 엔티티 상태 형식(id배열과 entity map)으로 유지하는 데 도움이 되는 라이브러리이다.
NgRx에서는 store에 여러 타입의 상태들을 저장하고 있다. 데이터들은 일반적으로 비지니스 데이터나 UI상태값이다.
예를 들어 Course와 Lesson 데이터를 관리한다면
{
  courses: [
      {
        id: 0,
        description: "Angular Ngrx Course",
        category: 'BEGINNER',
        seqNo: 1
    },
    {
        id: 1,
        description: "Angular for Beginners",
        category: 'BEGINNER',
        seqNo: 2
    },
    {
        id: 2,
        description: 'Angular Security Course - Web Security Fundamentals',
        category: 'ADVANCED',
        seqNo: 3
    },
    ...
  ],
  lessons: [
    {
        id: 1,
        "description": "Angular Tutorial For Beginners - Build Your First App - Hello World Step By Step",
        "duration": "4:17",
        "seqNo": 1,
        courseId: 1
    },
    {
        id: 2,
        "description": "Building Your First  Component - Component Composition",
        "duration": "2:07",
        "seqNo": 2,
        courseId: 1
    },
     ...
  ]
}
이런 식으로 배열을 이용해 관리를 하려고 할 것이다.
하지만 배열로 관리하는 것은 몇 가지 잠재적인 문제를 일으킬 수 있다.
- 특정 id의 코스를 찾고 싶다면 전체 course컬렉션을 순회하여 찾아야 한다.
- 배열이기 때문에 같은 id의 코스를 저장할 수 있다.
- 모든 아이템을 배열로 저장하면 리듀서들이 거의 동일한 형태로 보일것이다.
- 예를 들어 컬렉션에 새로운 아이템을 저장하는 간단한 경우에도 동일한 로직을 반복수행 해야하고 순서 정렬을 위해 아이템을 추가할 때 마다 재정렬을 해줘야 한다.
엔티티를 이용한다면 데이터를 평면화하여 데이터베이스에서와 같이 엔티티 고유 식별자를 사용하여 사용할 수 있다.
데이터는 아래와 같은 형태로 저장될 것이다.
{
    courses: {
        0: {
              id: 0,
              description: "Angular Ngrx Course",
              category: 'BEGINNER',
              seqNo: 1
           },
        },
        1: {
              id: 1,
              description: "Angular for Beginners",
              category: 'BEGINNER',
              seqNo: 2
        },
        2: {
              id: 2,
              description: "Angular Security Course - Web Security Fundamentals",
              category: 'BEGINNER',
              seqNo: 3
        }
    },
    lessons: {
        1: {
            id: 1,
            "description": "Angular Tutorial For Beginners - Build Your First App - Hello World Step By Step",
            "duration": "4:17",
            "seqNo": 1,
            courseId: 1
        },
        2: {
            id: 2,
            "description": "Building Your First  Component - Component Composition",
            "duration": "2:07",
            "seqNo": 2,
            courseId: 1
        },
        ....
        35: {
            id: 35,
            "description": "Unidirectional Data Flow And The Angular Development Mode",
            "duration": "7:07",
            "seqNo": 6,
            courseId: 0
        }
    }
}
id가 35인 코스를 조회할 때 courses컬렉션을 순회할 필요 없이 state.courses[35]로 조회할 수 있다.
순서를 정렬하고 싶다면 Map(called entities)과 Array를 사용한다.
{
    courses: {
        ids: [0, 1, 2],
        entities: {
            0: {
                  id: 0,
                  description: "Angular Ngrx Course",
                  category: 'BEGINNER',
                  seqNo: 1
               },
            },
            ...
        }
    },
    lessons: {
        ids: [1, 2, ... 35],
        entities: {
            1: {
                id: 1,
                "description": "Angular Tutorial For Beginners - Build Your First App - Hello World Step By Step",
                "duration": "4:17",
                "seqNo": 1,
                courseId: 1
            },
            ....
        }
    }
}
이렇게 엔티티 맵과 id배열을 결합한 형태를 Entity State format이라고 한다. Entity는 이러한 형태를 이용하여 데이터를 더 빠르고 쉽게 관리할 수 있게 도와주고 일반적인 리듀서 로직의 버그를 피할 수 있게 합니다.
기본적인 사용법
import { EntityState, EntityAdapter, createEntityAdapter } from '@ngrx/entity';

/*
// Entity Interface
interface EntityState<V> {
  ids: string[] | number[]; // 컬렉션에 있는 모든 엔티티 id배열
  entities: { [id: string | id: number]: V }; // id를 키값으로 가지는 엔티티컬렉션
}
*/

export interface User {
  id: string;
  name: string;
}

export interface State extends EntityState<User> {
  // additional entities state properties
  selectedUserId: string | null;
}

export function selectUserId(a: User): string {
  //In this case this would be optional since primary key is id
  return a.id;
}

export function sortByName(a: User, b: User): number {
  return a.name.localeCompare(b.name);
}

// adapter는 리듀서 함수 안에서 엔티티컬렉션을 관리하는 메서드를 제공
export const adapter: EntityAdapter<User> = createEntityAdapter<User>({
  selectId: selectUserId, // 컬렉션의 기본 id를 선택함, 디폴트는 id
  sortComparer: sortByName, // 정렬기능을 사용할 때, 없으면 정렬 안됨
});


// adapter를 이용해 initial state를 만들어 리듀서에서 사용
export const initialState: State = adapter.getInitialState({
  // additional entity state properties
  selectedUserId: null,
});

// 더 많은 메서드는 아래에
export const userReducer = createReducer(
  initialState,
  on(UserActions.addUsers, (state, { users }) => {
    return adapter.addMany(users, state);
  }),
  on(UserActions.updateUser, (state, { update }) => {
    return adapter.updateOne(update, state);
  }),
  on(UserActions.updateUsers, (state, { updates }) => {
    return adapter.updateMany(updates, state);
  }),
  on(UserActions.deleteUser, (state, { id }) => {
    return adapter.removeOne(id, state);
  }),
);

// 셀렉터
export const getSelectedUserId = (state: State) => state.selectedUserId;

// get the selectors
const {
  selectIds,
  selectEntities,
  selectAll,
  selectTotal,
} = adapter.getSelectors();

// select the array of user ids
export const selectUserIds = selectIds;

// select the dictionary of user entities
export const selectUserEntities = selectEntities;

// select the array of users
export const selectAllUsers = selectAll;

// select the total user count
export const selectUserTotal = selectTotal;
adapter method
- addOne: 컬렉션에 하나의 엔터티 추가
- addMany: 여러 엔티티 추가
- addAll: 전체 컬렉션을 새 컬렉션으로 바꿉니다.
- removeOne: 하나의 엔티티를 제거
- removeMany: 여러 엔티티를 제거합니다.
- removeAll: 전체 컬렉션 지우기
- updateOne: 하나의 기존 엔티티 업데이트
- updateMany: 여러 기존 엔티티 업데이트
- upsertOne: 하나의 엔터티 업데이트 또는 삽입
- upsertMany: 여러 항목 업데이트 또는 삽입

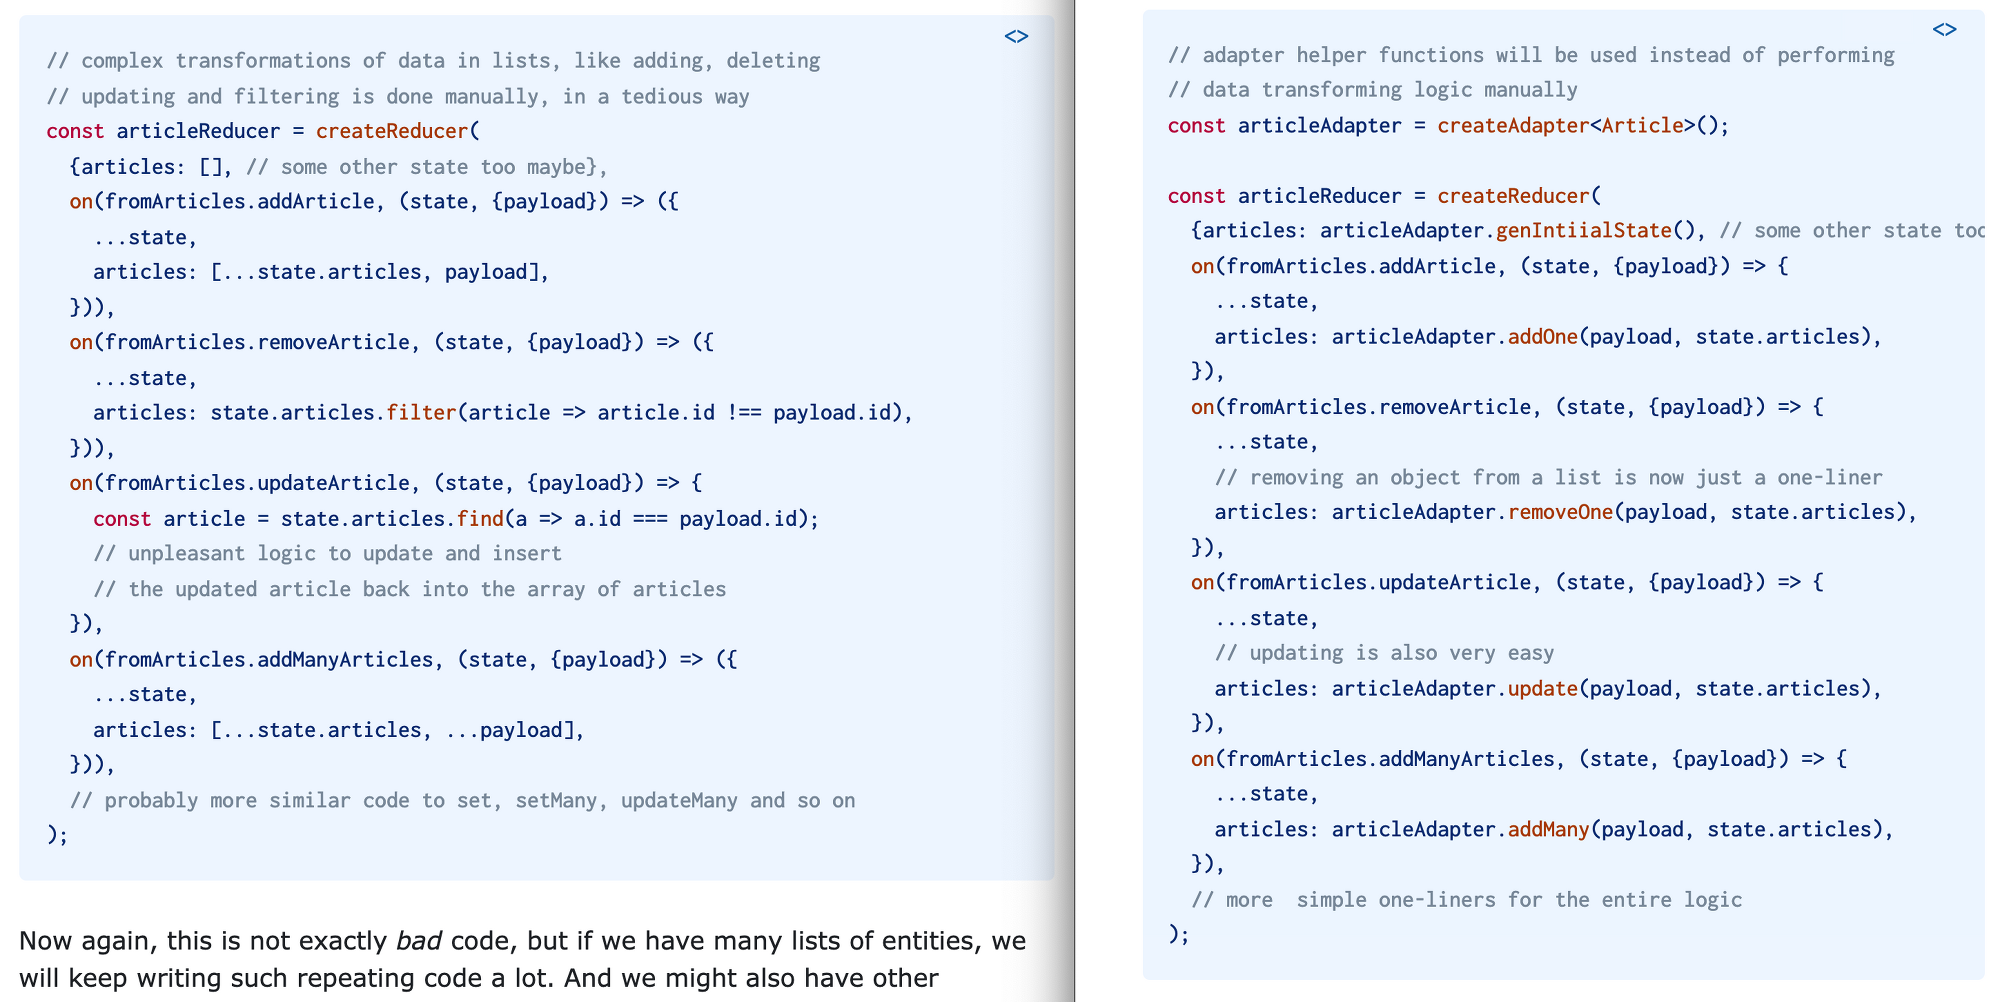
entity를 쓰지 않은 리듀서와 entity를 사용한 리듀서이다.
로직을 직접 작성하지 않아도 돼서 훨씬 간편하고 코드도 간결해졌다!
번역하다보니 귀찮아져서 이쯤 마무리하지만
직접 적용을 위한 가이드는
https://blog.angular-university.io/ngrx-entity/ 이곳을 참고바란다.
state를 편하게 작성할 수 있는 방법과 selector, action을 구현하는 방법에 대해서도 자세히 나와있다.
'프로그래밍 > Angular' 카테고리의 다른 글
| constructor와 ngOnInit의 차이점 (0) | 2022.03.16 |
|---|---|
| Angular app 성능을 최적화하는 10가지 기술 (3) | 2021.07.13 |
| ViewContainerRef를 사용한 Angular DOM manipulation (0) | 2021.06.19 |
| [RxJS] 유용하게 사용하는 RxJS문법 추천 (2) | 2020.10.22 |
| Angular 9와 Ivy (0) | 2020.10.22 |
